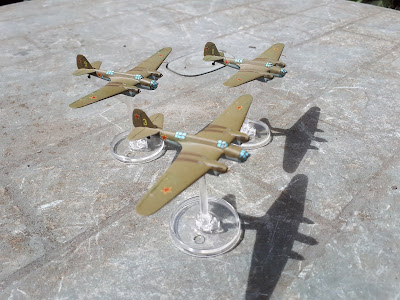
For clarity I'm going to keep calling these "Zvezda" kits even though they are reboxed by Warlord. As I mentioned in the earlier post the kits went together well and with little problems. I decided NOT to use the conversion "plug" that they come with that allows you to mount the models on the Advantage bases for Blood Red Skies - I'm using Hawk Wargames "widgets" which are a bit smaller and work well for smaller bombers like the SB2, and I have a bag full left over from Dropzone and Dropfleet Commander.
I was now in a hurry to get them done and table ready. The Zvezda kits have clear canopies and front and rear glasshouses. I toyed withe the idea of leaving them clear and painting the frames etc - then common sense took over - all the other planes will have painted canopies so why bother with these? I stuck them down and undercoated everything in a white primer - so far so good. Once the primer was dry I sprayed the upper sides a suitably "Soviet" green. This was pretty much my first error. Looking at the various sources it became clear that many (most?) SB2s were left in bare aluminium until the war broke out, and camouflage was applied by the ground crews, in many cases by just painting wavy lines or "squiggles" in green leaving quite a bit of the aluminium showing. I think this would have looked quite "cool" but couldnt face it - the plan being to keep things simple*. I finished blocking areas with green and light blue gray undersides, then went to have a look at panel lines....... but there are none on the model. This is no real surprise. Panel lines are going to be invisible at this scale, however I have to admit I love painting the Warlord models partly because the exaggerated scale of the panel lines makes them "pop". The only lines on the Zvezda kit are the flaps and rudder, which I painted a darker green. I also painted the exhausts etc and added some prominent exhaust marks on the tops of the wings. I still have the undersides to complete but I was hoping to get them on table asap so left that for "later". I did add a "panel line" around the rear fuselage as the joint between the tail unit and fuselage was pretty obvious - I didnt want to have to start filling and sanding on such small planes, so a line happily hides that joint.
Decals were "interesting" too. I didn't use the ones in the kit but I replaced them with some from Mehusla I had lying around. I had intended to paint the rudders a contrasting colour but then thought - CBA for the moment.
Here's where I am now
I still need to attach the props - or rather the spinners - I'm going to cut the prop blades off as they are clearly going to snap in use anyway. I was thinking about using some acetate circles - depends on how I feel later. Once the undersides decals are on and some minor detailing done I think I may go back and paint some panel lines on the wings.
As you can no doubt tell I'm rushing this build and cutting corners where maybe I should not. Even so, I think they look OK. Next post I will try and sum up, and maybe compare them with "the competition" third party models that I have lying around.
*as an aside it looks like even the more "professional" 2 and 3 colour camo schemes were applied ad hoc by individual units - which has the advantage of making it difficult to go wrong.

No comments:
Post a Comment